
Moving a website is one of those projects that looks simple from the outside and turns into a minefield the moment you start clicking around in cPanel. A WordPress migration touches your hosting, your domain, your database, your files, and, if you get any of it wrong, your search rankings. None of that has to be scary. It just has to be done in order, with a checklist, and with someone watching the details you’re too busy to watch yourself.
This guide walks through every stage of a WordPress website migration: planning, hosting changes, domain migration, redirects, database migration, testing, SEO preservation, and the post-migration checks that catch problems before your visitors do.
Key Takeaways
- A successful WordPress migration starts with a full inventory and a rollback plan, not with copying files.
- Database migration and URL search-and-replace are where most WordPress migrations break, so back up before you touch either.
- 301 redirects and an updated XML sitemap are non-negotiable if you want to preserve SEO rankings after migration.
- Staging-environment testing catches broken plugins, mixed-content warnings, and permission errors before launch.
- Professional WordPress migration services exist precisely because a single missed step (a stale DNS record, an unmapped redirect) can cost weeks of recovery time.
What Is a WordPress Migration? (4 Types Explained)
People use the term loosely, but there are really four distinct scenarios, and each one changes what you need to plan for:
- Host-to-host migration: Same WordPress site, new hosting provider (e.g., moving from shared hosting to managed WordPress hosting).
- Domain migration: The site stays on WordPress but moves to a new domain name, often after a rebrand.
- Platform migration: You migrate a website to WordPress from Wix, Squarespace, Shopify, or a custom CMS.
- Environment migration: Moving from staging to production, or from HTTP to HTTPS, or from a subdomain to a root domain.
Most real-world projects combine two or three of these at once, such as a new host and a new domain. That combination is exactly why migration planning matters: each layer adds its own set of things that can break.
How to Migrate a WordPress Website: Step-by-Step Process
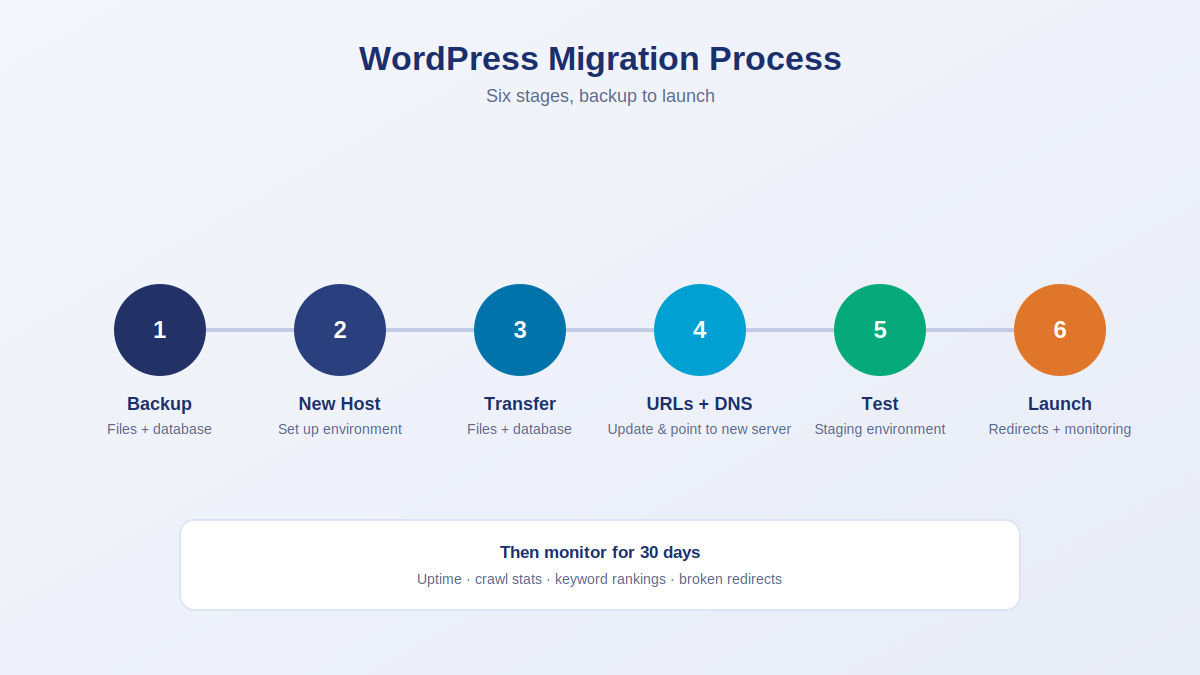
This is the short version of the whole guide: eleven steps, in order, from backup to post-launch monitoring. Each step is covered in more depth further down, but if you only need the checklist-style overview, start here.
- Back up the website: Take a full backup, files and database, and store a copy off-server before touching anything else.
- Set up new hosting: Provision the new server or hosting plan and confirm it meets your PHP, MySQL, and resource requirements.
- Transfer files: Move the WordPress core, themes, plugins, and the
/wp-content/uploads/media library to the new environment. - Migrate the database: Export the database from the old environment and import it cleanly into the new one.
- Update URLs: Run a serialization-safe search-and-replace to update the site URL and any hard-coded references.
- Configure SSL: Install and verify the SSL certificate on the new environment before it goes live to visitors.
- Test the website: Check every page template, form, plugin, and integration on a staging URL, never on the live domain.
- Update DNS: Point the domain’s DNS records at the new server, after lowering the TTL in advance.
- Set up 301 redirects: Map every changed URL to its new destination so links and rankings carry over.
- Verify SEO: Confirm the sitemap, robots.txt, meta data, and Search Console property are all correct on the new site.
- Monitor after launch: Watch uptime, crawl stats, and rankings for at least the first 30 days.
Migration Planning: Build the Inventory First
Before anything gets copied, cloned, or exported, take stock of what actually exists on the current site. Skipping this step is the single biggest reason WordPress migrations run over time and budget.
A solid inventory includes:
- Core files and theme: Active theme, child theme (if any), and hard-coded customizations in
functions.phpor template files. - Plugins: A full list, including premium/licensed plugins that will need reactivation on the new environment.
- Database size and table count: Large databases with years of revisions and spam comments take longer to move and are more prone to timeout errors.
- Media library size:
/wp-content/uploads/is often the largest chunk of data to transfer. - Custom post types and ACF fields: These need to map correctly or content silently disappears from the front end.
- Third-party integrations: Payment gateways, CRMs, and any API keys tied to the old domain.
- DNS records: MX records for email, TXT verification records, and any subdomains in use.
Once the inventory is done, write a rollback plan: what exactly you’ll do if the new environment fails testing. That usually means keeping the old site live and untouched until the new one is fully verified. Never point DNS at a new server until you’ve confirmed the migration works.
For complete assistance, learn more about our WordPress migration services.
Hosting Changes: Choosing and Preparing the New Environment
If the migration includes a new host, match the environment to the site’s actual needs rather than defaulting to whatever plan looks cheapest.
- Check PHP and MySQL versions: A site built five years ago may still run on an outdated PHP version. Confirm the new host supports what your theme and plugins require, and test compatibility before cutting over, not after.
- Match or exceed resource limits: Memory limits, max execution time, and upload file size caps all affect whether a database import or media upload completes without timing out.
- Set up SSL before launch: Most managed hosts provision a free certificate automatically, but if you’re moving to a VPS, get it configured and tested ahead of the cutover so the site isn’t live without HTTPS even briefly.
- Configure caching and CDN separately: A CDN still pointed at the old server after DNS has switched will serve stale or broken assets to visitors.
Domain Migration: Moving Without Losing Ground
Domain migration is its own risk category, separate from hosting. If your project includes a rebrand or domain change, a few things need to happen in a specific order:
- Complete and test the WordPress website migration on the new hosting environment first, using a temporary URL or staging subdomain.
- Update the WordPress site URL and home URL settings only after testing is complete.
- Run a full database search-and-replace to update every hard-coded reference to the old domain in post content, widget text, theme options, and serialized data.
- Update DNS records to point the new domain at the new server, and lower the DNS TTL (time to live) 24-48 hours in advance so the change propagates faster.
- Keep the old domain registered and pointed to a redirect service for at least 6-12 months, ideally longer, so any lingering backlinks and bookmarks still resolve.
Beware of Serialized Data: Serialized data is the detail that trips up manual migrations most often. WordPress stores some settings (widget configurations, some plugin options) as PHP serialized arrays, and a plain find-and-replace on the database will corrupt them because it changes the character count without updating the stored string length. Use a serialization-aware search-and-replace tool rather than a raw SQL query.
Redirects: Protecting the Links You Already Have
Every URL that changes because of a domain migration, a restructured permalink setting, or a platform migration to WordPress needs a 301 redirect from the old URL to its new equivalent. This is where SEO preservation lives or dies.
Build a redirect map before launch, not after. Export a full list of existing URLs (from Google Search Console, your XML sitemap, and a site crawl) and match each one to its new destination. For a platform migration, say you migrate a website to WordPress from Shopify or Squarespace, URL structures often change completely, which means this mapping step can be the most time-consuming part of the whole project. It’s also the part worth doing properly, since a missing redirect means a broken link for every visitor and search engine that follows it.
A few rules that hold up across most migrations:
- Use 301 (permanent) redirects, not 302, for anything that isn’t temporary.
- Avoid redirect chains: redirect A directly to C, not A to B to C.
- Redirect at the most specific URL level possible; blanket-redirecting everything to the homepage hurts both user experience and rankings.
- Test every redirect after launch, not just a sample.
Database Migration: The Technical Core
The WordPress database holds every post, page, comment, setting, and (via serialization) a fair number of plugin configurations. Moving it correctly means:
- Export cleanly: Use phpMyAdmin, WP-CLI (
wp db export), or a migration plugin to avoid partial exports that skip tables. - Clean before you move: Delete spam comments, expired transients, and post revisions before export to shrink the file and speed up import.
- Import and verify: Confirm table count matches. A truncated import (common on shared hosting) silently drops tables without always throwing a visible error.
- Update options: Update the
wp_optionstable:siteurlandhomeneed to match the new domain exactly, including the protocol. - Search and replace: Run the serialization-safe search-and-replace described above for any remaining old-domain references.
For large sites, such as multi-gigabyte databases, e-commerce catalogs, and membership sites with years of user data, a plugin-based export/import often isn’t practical within hosting resource limits. This is typically where professional migration services earn their cost.
Testing: Before Anyone Else Sees It
Testing happens on a staging environment or a temporary URL, never on a live domain that visitors and search engines can already reach.
Run through this list methodically:
- Visual QA: Check the homepage, key landing pages, blog templates, and custom post type archives across desktop and mobile.
- Forms and checkout flows: Submit every form; if it’s WooCommerce, run a full test transaction.
- Plugin functionality: Reactivate licensed plugins with the new domain’s license key, and check for conflicts introduced by version differences on the new host.
- Mixed content warnings: Hard-coded
http://references will trigger browser warnings even after SSL is active; a console check catches these fast. - File and folder permissions: Incorrect permissions after a transfer are a common source of upload errors and broken image generation.
- Email deliverability: Confirm transactional emails are still sent correctly from the new server.
- Page speed: Compare Core Web Vitals before and after; a migration is a good moment to catch a slower host or unoptimized images.
SEO Preservation: Don’t Let Rankings Slip
SEO preservation isn’t a separate phase. It’s threaded through planning, redirects, and testing above, but a few items deserve their own checklist entry:
- Submit the updated XML sitemap to Google Search Console and Bing Webmaster Tools immediately after launch.
- Verify the new property in Search Console if the domain changed, and use the Change of Address tool for domain migrations.
- Check
robots.txtto confirm it isn’t accidentally blocking crawlers on the new environment (a shockingly common mistake, as staging sites often ship withDisallow: /left in place). - Preserve meta titles, descriptions, and structured data exactly as they were, unless the migration is paired with an intentional content refresh.
- Monitor crawl stats and indexing status for 4-6 weeks post-launch; a temporary ranking dip during re-indexing is normal, but sustained drops usually point to a missed redirect or a
noindextag left over from staging. - Keep internal linking intact: if URL structures changed, update internal links to point directly to new URLs rather than relying on redirect chains to carry the link equity.
Pre-Migration vs. Post-Migration SEO Checklist
For WordPress SEO work beyond the migration itself, technical SEO and Core Web Vitals tuning are worth revisiting once the new environment is stable.
| Area | Before Migration | After Migration |
|---|---|---|
| Rankings | Record baseline positions for top keywords | Compare weekly against baseline for 4-6 weeks |
| URLs | Export a full list of live URLs | Confirm every old URL 301-redirects correctly |
| Metadata | Document current titles and descriptions | Verify titles/descriptions matched, not overwritten |
| Canonicals | Note existing canonical tags | Confirm canonicals point to the new, correct URLs |
| Sitemap | Save the current XML sitemap | Generate and submit the updated sitemap |
| Robots.txt | Save the current robots.txt | Confirm it isn’t blocking crawlers (no leftover Disallow: /) |
| Internal links | Map internal links to old URLs | Update internal links to new URLs directly |
| Redirects | Build the full redirect map | Test every redirect, not a sample |
| Search Console | Confirm current property is verified | Verify new property/domain, submit Change of Address if needed |
| Indexing | Note current indexed page count | Monitor indexing status until it matches or exceeds baseline |
Post-Migration Checks: The First 30 Days
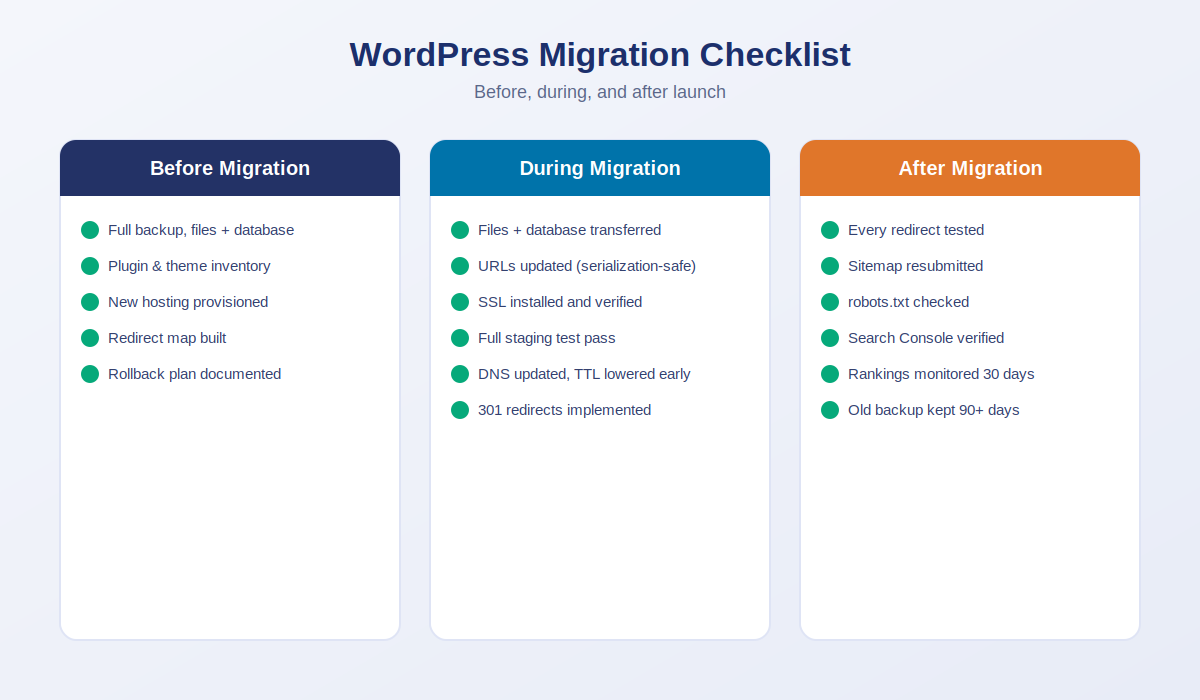
Migration doesn’t end at launch. Budget for a follow-up window:
- Day 1-3: Monitor uptime, server error logs, and 404 reports. Fix broken redirects immediately.
- Week 1: Compare Search Console impressions and clicks against the pre-migration baseline. Confirm the sitemap has been crawled.
- Week 2-4: Watch for ranking fluctuations on your top 20-30 keywords. Check that backlinks pointing to old URLs are correctly redirecting.
- Ongoing: Decommission the old hosting environment only after DNS has fully propagated and you’ve confirmed no residual traffic is hitting it (check server logs, not just assumption).
Keep a full backup of the old environment for at least 90 days after migration, even after everything looks stable. It’s cheap insurance against a redirect gap or missing content that only surfaces once real user traffic starts finding it.
When to Bring in Migration Specialists
A small brochure site with a handful of pages is a reasonable DIY project for anyone comfortable with cPanel and phpMyAdmin. A migration involving a large database, e-commerce data, a domain change, and SEO history you can’t afford to lose is a different calculation. The cost of getting it wrong (weeks of lost rankings, corrupted data, days of downtime) usually outweighs the cost of hiring it out.
That’s the gap dedicated WordPress migration services are built to close: zero-downtime transfers, serialization-safe database handling, full redirect mapping, and SEO monitoring through the post-launch window, handled by a team that runs this process regularly instead of once every few years.
What “PSD to WordPress” really means
“PSD to WordPress” is shorthand for converting a finished visual design, whether it’s an actual Photoshop (.psd) file, a Figma board, an Adobe XD file, or a Sketch file, into a fully functional, content-manageable WordPress website. The design is the picture; the conversion is the engineering that makes that picture a live, editable, responsive site.
The reason the term still says “PSD” is historical. Today most designs arrive as Figma files, but the job is identical: take a pixel-accurate design and rebuild it as clean, hand-coded WordPress that looks exactly like the mockup on every screen size and loads fast. If you want the full service breakdown, see our PSD to WordPress conversion service.
How much does PSD to WordPress conversion cost in 2026?
Pricing depends almost entirely on the complexity of the design and how much custom functionality sits behind it. As a realistic 2026 benchmark, here is what different project sizes typically cost when handled by a professional agency rather than a bargain marketplace:
| Project type | Typical scope | Indicative range |
|---|---|---|
| Single landing page | One responsive page, basic form | $300 – $700 |
| Small business site | 5–8 pages, blog, contact forms | $1,200 – $3,000 |
| Custom business / corporate | 10–20 pages, custom post types, integrations | $3,000 – $8,000 |
| WooCommerce / complex build | Store, custom features, third-party APIs | $8,000+ |
The single biggest cost driver isn’t the number of pages, it’s the amount of custom functionality. A beautiful but simple brochure site is quick. The same design with a booking system, member area, or product configurator is a different engagement entirely.
Why the cheapest quote usually costs more. A $99 conversion almost always means a bloated page-builder template, non-semantic markup, and code that breaks at the next WordPress or PHP update. You pay the difference later in slow load times, failed updates, and a rebuild. Hand-coded conversion costs more up front and far less over the life of the site.
The PSD to WordPress conversion process, step by step
1. Design review and slicing
Before any code is written, the design is reviewed for completeness: are all states, breakpoints, and interactive elements defined? The design is then “sliced” conceptually into reusable components: header, hero, cards, footer, and so on. Good teams flag missing states (hover, error, empty, mobile) at this stage rather than guessing later.
2. Static HTML/CSS build
The design is first built as clean, semantic, responsive HTML and CSS, pixel-matched to the mockup and tested across devices. Building the front end before touching WordPress keeps the markup lightweight and standards-compliant instead of inheriting a page builder’s bloat.
3. WordPress integration
The static build is converted into a WordPress theme: template files, the loop, menus, widget areas, and custom fields so every piece of content is editable from the dashboard. This is where a conversion becomes a real CMS rather than a frozen picture. If your design needs ongoing visual control, it often pairs well with WordPress theme customization.
4. Functionality and custom features
Forms, sliders, filters, integrations, and any bespoke logic are wired in, frequently as custom WordPress development when off-the-shelf plugins don’t fit the requirement cleanly.
5. Testing, optimization and launch
The finished site is tested for cross-browser consistency, mobile responsiveness, Core Web Vitals, and accessibility, then optimized for speed before going live. A proper handover includes documentation so your team can manage content confidently.
What separates a good conversion from a cheap one
- Hand-coded, semantic markup: Not a generic theme stretched to fit, which keeps pages light and SEO-friendly.
- Pixel accuracy: The live site matches the design on every breakpoint, not just desktop.
- Performance built in: Fast loading and strong Core Web Vitals from day one, not bolted on afterward.
- Update-safe code: Survives WordPress core and PHP updates instead of breaking with each release.
- Editable content: Every section is manageable in the dashboard, so you’re not dependent on a developer for routine edits.
How long does it take?
A single landing page can be turned around in a few days. A standard small-business site typically takes one to three weeks. Custom and WooCommerce builds run longer depending on the functionality involved. The realistic variable is always custom features and revision rounds: a clean, complete design with clear requirements moves dramatically faster than one with open questions.
A WordPress migration is a checklist problem dressed up as a technical one. The technical steps (exporting a database, updating DNS, configuring SSL) are well documented and mostly mechanical. What actually determines whether a migration goes smoothly is whether every step got planned, tested, and verified in the right order, with redirects and SEO preservation treated as first-class parts of the project rather than an afterthought.
If your migration involves more than a single small site, a domain change, a platform switch, or content and traffic you can’t afford to lose, it’s worth talking to a team that handles this as a specialty. Explore WordPress migration services, browse WordPress Development Services for related build work, or check out ongoing WordPress Maintenance plans to keep the site healthy long after launch.
Have a design or migration ready to build?
Send us your PSD, Figma, XD or site details for a pixel-perfect, fast, SEO-ready WordPress site, quoted within 24 hours.
Get a Free Quote